Adding customizable fields
Unity Playworks supports in-browser customisation of playables. This is achieved by the use of Unity Playworks Fields. Unity Playworks Fields are values that are exposed in Unity Playworks Editor as separate controls that allow developers to change some variables without rebuilding the playable.
Adding Unity Playworks fields to a playable
1. Open playground.json configuration file and locate "fields" key.
2. Add as many fields as you like.
Each field is defined as a simple JSON object residing under specific class name and field name. Let's take this by example: consider the below playground.json:
{
  "title": "Basic Playable",
  "icon": "", // Icon next to the playable in Unity Playworks, takes a Data URL.

  "fields": {
    "MyClass": {
      "MyField": {
        "title": "Field Title",
        "type": "string",
        "defaultValue": "hello, there!",
        "section": "",
        "order": 0,
        "localization": 0,
        "options": {}
      }
    }
  }
}
The name of the class (MyClass in the above example) and the field (MyField above) are arbitrary - feel free to use whatever makes sense in your setup. Multiple fields can share the same class name, but the pair class name + field name should be unique. Please keep in mind, however, that updating the playable (uploading a new archive in the place of the previously uploaded one) will take those in consideration trying to match the fields based on the combination of class and field name. For instance, if you keep names the same and do not change field type, it will be retained in all versions keeping the values previously set through the Unity Playworks.
Let us summarize all available field types:
| type | Description | Additional notes |
|---|---|---|
| string | A string value, can be multi-line | "defaultValue" should be a string, i.e. "not set" |
| int32 | An int32 value | "defaultValue" should be an int32, i.e. 100 |
| float | A floating-point value | "defaultValue" can be any number, i.e. 100.12 |
| bool | A boolean value | "defaultValue" can be 0 or 1 |
| enum | An integer value with preset list of options | "options" key is expected to contain allowed entries, i.e. { "0": "Level 0", "1": "Level 1" } |
| color | An RGBA color value | "defaultValue" should be an array of 4 values of RGBA components, in 0..1 range, i.e. [ 1, 0, 0, 1 ] |
| vector2 | A 2 component vector | "defaultValue" should be an array of 2 values, i.e. [ 100, 200 ] |
| vector3 | A 3 component vector | "defaultValue" should be an array of 3 values, i.e. [ 100, 200, 300 ] |
| vector4 | A 4 component vector | "defaultValue" should be an array of 4 values, i.e. [ 100, 200, 300, 400 ] |
Constraints
You can add a constraints object to a field to set limits for its values, this will stop values entered in Unity Playworks going under/over the set min/max.
An example of adding a constraints object to a field can be seen below.
Setting int/float constraints
If you make use of both the value_min & value_max constraints, your field will appear as a range slider in Unity Playworks.
value_step can also be added in order to control at what value the slider increments at, though it is not required in order for a slider to function.
By default sliders in Unity Playworks will increment by 1 if the slider is affecting an int value, and for float values the default is the difference between the minimum and maximum slider values divided by 100 (max - min)/100.
| name | Description | Additional notes |
|---|---|---|
| value_min | int32/float value | Set a minimum value for an int or float field |
| value_max | int32/float value | Set a maximum value for an int or float field |
| value_step | int32/float value | Set the increment value for an int or float field |
Example
"mySlider":{
    "title": "mySlider",
    "type": "int32",
    "defaultValue": 10,
    "constraints": {
         "value_min":1,
         "value_max":15,
         "value_step":1
    }
}
Setting array constraints
If you have an array of Vectors or Colors, you can set the minimum and/or maximum length of said array using the constraints below. Arrays can function in Unity Playworks without min or max lengths set, however they will not have limits on the amount of items allowed to be entered into them.
| name | Description | Additional notes |
|---|---|---|
| array_min_length | int32/float value | Set a minimum value for an int or float field |
| array_max_length | int32/float value | Set a maximum value for an int or float field |
Example
"myVec3Array":{
    "title": "myVec3Array",
    "type": "vector3[]",
    "defaultValue": [
        [2,4,6], [1,3,5]
    ],
    "constraints": {
        "array_min_length":0,
        "array_max_length":3
    }
}
3. Add JavaScript code to use the values from your playable
In order to grab the value of the Unity Playworks Field, please use Luna.Unity.Playground.get. Since you might want to test your playable locally, don't forget to check for Unity Playworks API presence before calling the API, i.e.
function startGame() {
  // initialize your game as normal
  // ...

  // check if Unity Playworks is defined meaning Unity Playworks API is available
  if ('Luna' in window) {
    const myValue = Luna.Unity.Playground.get(
      'MyClass',
      'MyField',
      'fallback value'
    );
    // do something with myValue
    // ...
  }

  // continue to initialize your game as normal :)
  // ...
}
The Luna.Unity.Playground.get will return a value of corresponding type: if the Unity Playworks Field is defined to be a string, a string will be returned; if it's vector, an array will be returned and so on. Color fields allow you to pass an additional, 4th argument to Luna.Unity.Playground.get with the value set to rgba which will make it return a CSS-compatible string corresponding to the color, i.e. #ff00ffff.
Ready-to-use example
Feel free to check the example residing at https://github.com/LunaCommunity/Playable-Examples/tree/master/full for a minimal setup of a playable using Playground Fields.
Localize your fields
Unity Playworks fields can be localised by adding a new property to the playground.json file. This feature aims to help users increment the level of communication within teams.
Here is a step-by-step process that will help you implement localisation for your Playground Fields:
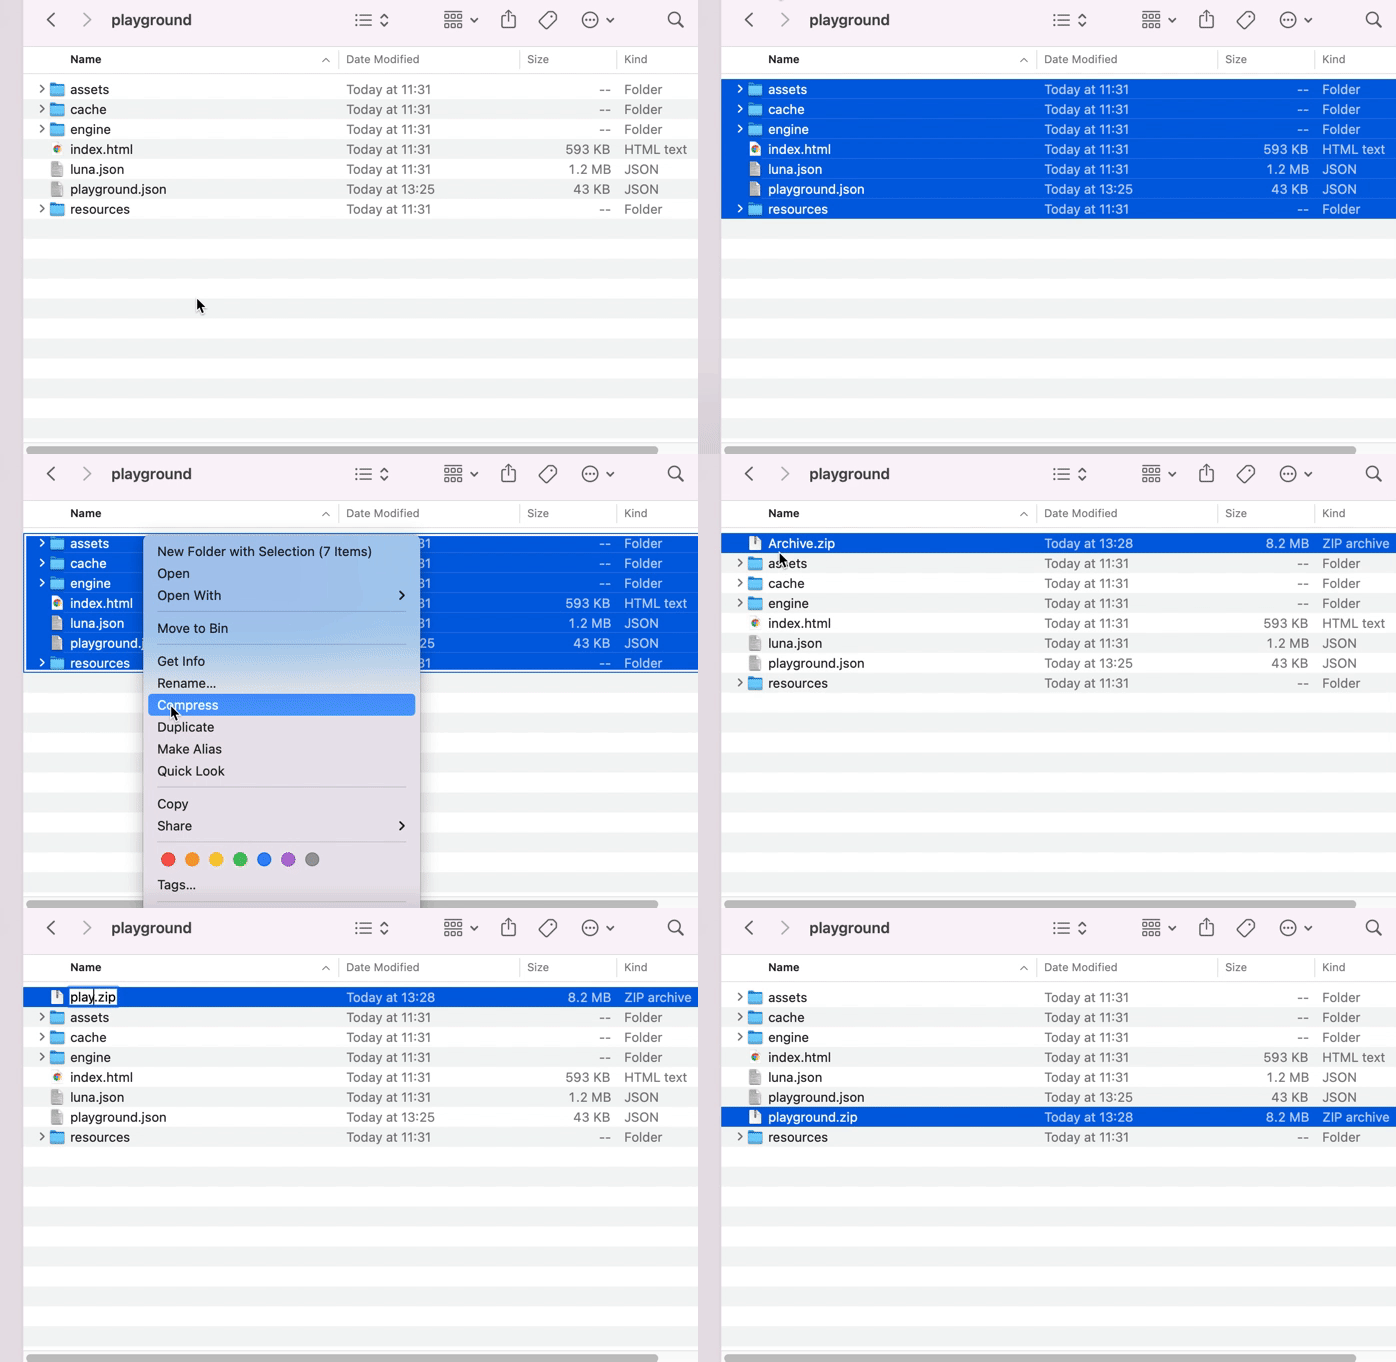
Extract zipped files - Open the zip file called playground.zip, then extract its content.
Modify the playground.json file - The
playground.jsonfile can be found between the extracted files. In order to localize your Unity Playworks Fields you will need to add thelocalized_field_titleproperty to the field object. This will be an object too with a list of all possible translation the field can have. The example below shows a language code (ru-RU) followed by the translation for that Unity Playworks field in Russian."fields": {
"Settings": {
"ButtonTitle": {
"title": "Button Title",
"type": "string",
"defaultValue": "hello, there!",
// The property below is responsible for the field localization
"localized_field_title": {
"ru-RU": "Текст кнопки",
}
}
}
}You can also add multiple translation properties:
"localized_field_title": {
                    "ru-RU": "Текст кнопки",
                    "zh-CN": "按钮文本",
                    "ja-JP": "ボタンテキスト",
                    "it-IT": "Testo del pulsante"
                    // and more!
                }
Zip the files again - Once you added your translations for your Unity Playworks fields, save the JSON file and zip all of the folder content again.

- Upload the zip file to Unity Playworks - Open Unity Playworks, then select or create an app for your build. Press on
+ Conceptand drag & drop the new zip file into the pop up window.
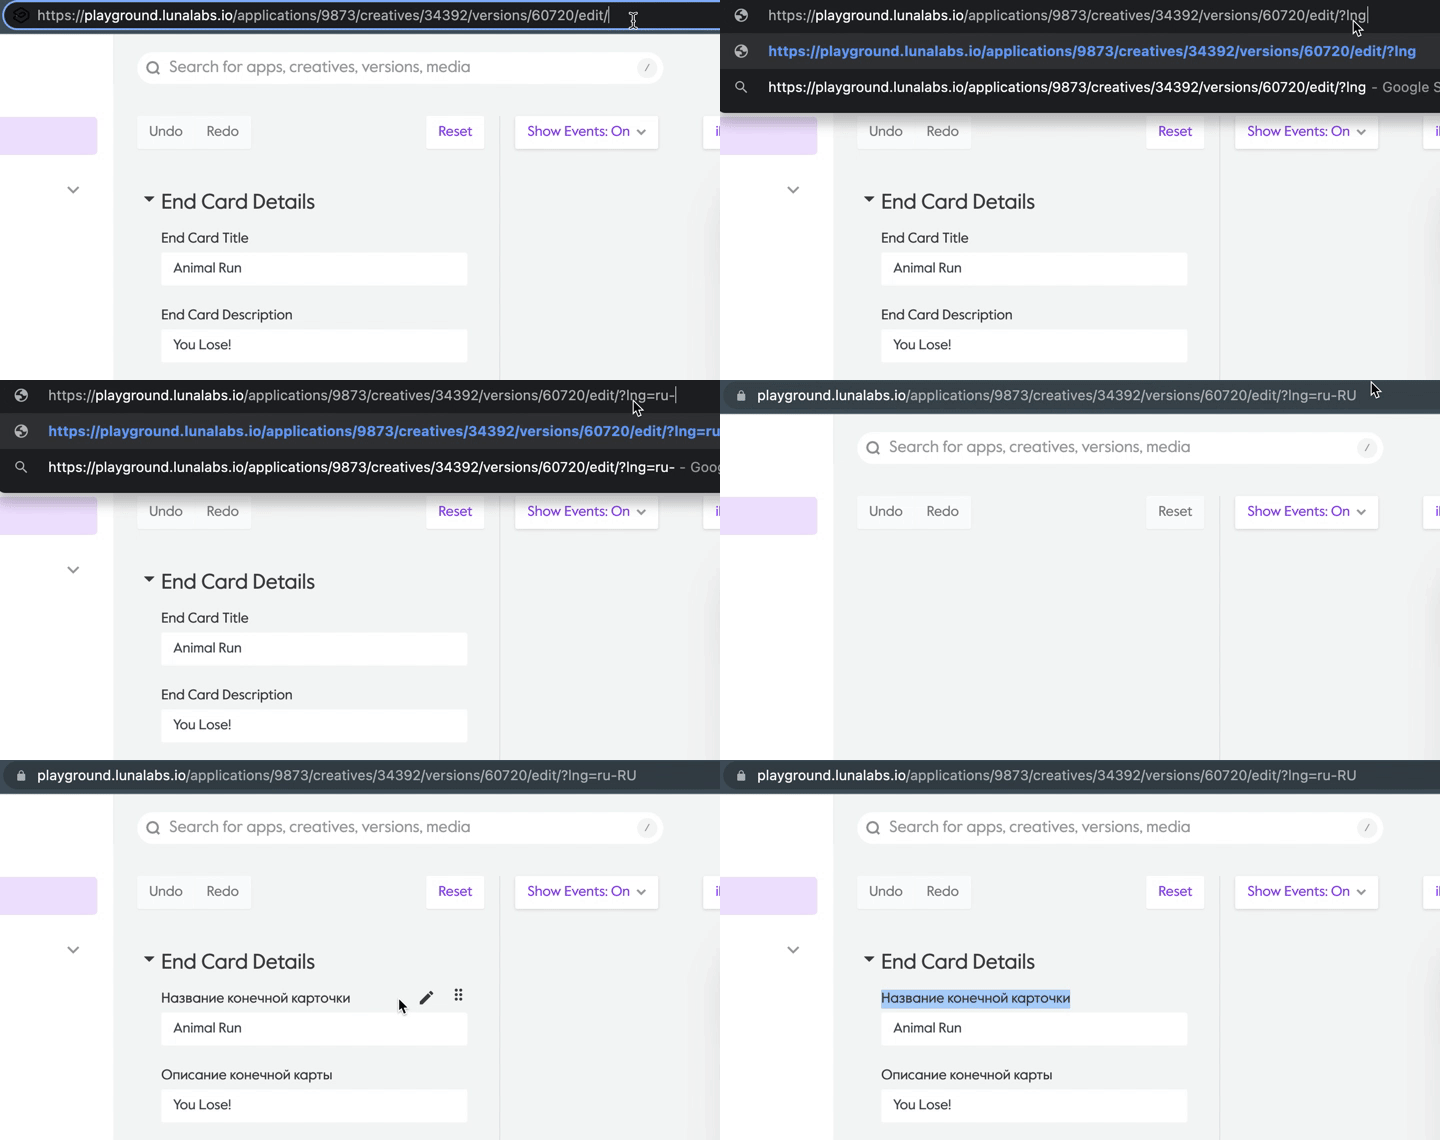
- Add language parameter to your Unity Playworks URL - Finally - after Unity Playworks completed the uploading of your build - open the creative and add
?lng=in your address bar, at the end of the existing URL. Your fields will translate according to what parameter you are passing through the query. In the example below we usedru-RUfor Russian.

Adding hints to a field in Unity Playworks
In the playground.json file you can add another attribute to your playable fields: localized_field_hint. By using this attribute, you can indicate what the field is used for, as well as add different translations to the hint.
Here is an example of how to add this field to your playground.json file:
{
  "title": "....",

  "fields": {
    "Settings": {
      "ButtonTitle": {
        "title": "Button Title",
        "type": "string",
        "defaultValue": "hello, there!",
        "localized_field_hint": {
          "ru-RU": "Этот текст будет виден на кнопке",
          "en-US": "This text will be visible on CTA button"
        }
      }
    }
  }
}
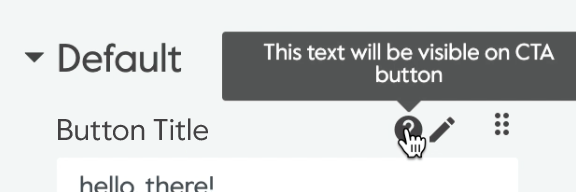
In Unity Playworks, a tooltip will appear next to the field that contains the hint.

To achieve this, compress your build files with the updated playground.json and upload the build into Unity Playworks.
By using the ?lng= parameter in your address bar, it is possible to switch between the different localisations added to the hint attribute. This is exaplained in more details above.